Friday, November 5, 2010

Home Modified Indian Mynah Trap

 The little buggers should enter stage right under the green trapdoor and continue down toward the dried dog food in the black container on the trigger plate.Once the bird starts to eat the vibrations will trigger the trapdoor to close rapidly. This will capture the first bird into the trap. This bird will stay in the trap and act as the caller for the rest (hopefully). There will be water in the cage so the mynah will not suffer. I have put newspaper down because I am not partial to mynah faeces on the BBQ table!

 Top view.

 As the trapdoor is now closed there has to be another way into the cage for other mynahs. This is thru the tunnel on the top of the cage. Mynah birde are not adverse to pushing thru small openings as they do this all the time to nest in roofs and hollow trees. The caller bird will bring them in and they will land on the top of the cage and see the food thru the tunnel and enter the cage. The tunnel stops about 100mm above the floor of the cage and is fashioned in such a way they cannot leave via the tunnel.


This is a view of the trapdoor and trigger mechanism at the front of the trap. The trigger mechanism was filed down to make it, as we say in hunting parlance, "a hair trigger". This was done because the cage was originally a possum trap and possums are a lot heavier then mynah birds and the lighter mynah bird would not trigger the trapdoor without this modification. This trap originally cost $79.00 at FX Larkin at Unanderra a few years ago.

A "proper" mynah trap retails for around $300.00 on the internet. You would have to hate the buggers a lot to spend 300 bucks to kill 'em I reckon!


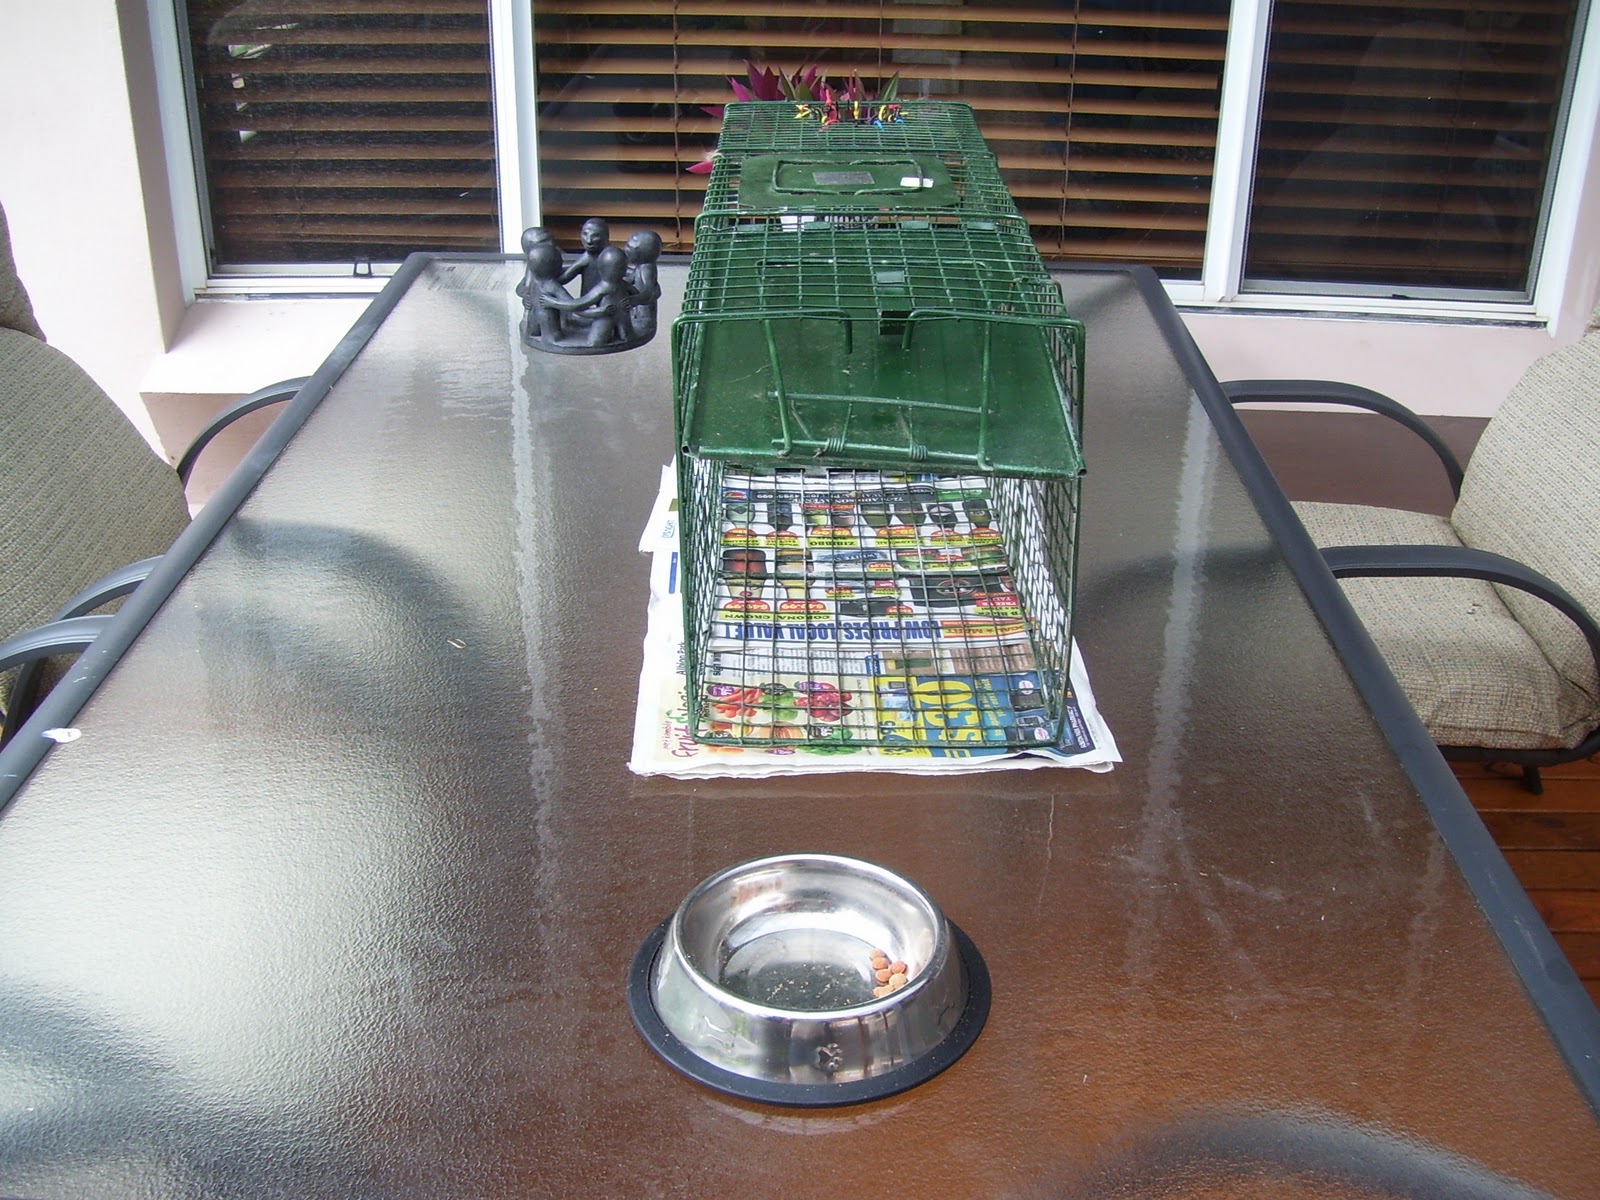
Here is an end view of the trap with the dog food bowl that the mynahs are used to eating out of. This, hopefully, will lure them in and when the couple of biscuits are devoured the mynahs will enter the trap.The trap only went into use today so I will keep you posted on its success. Cruelty is out of the question and Indian Mynahs must be euthanised humanely. A vet will usually help here. Wear gloves as they are filthy, lice and disease infested, savage little shits that will peck you!

Saturday, October 23, 2010

DAMPER PARMIGIANA

DAMPER PARMIGIANA

INGREDIANTS:    3 Level camp mugs self-raising flour
                               2 heaped tablespoons grated parmisan cheese
                               2 heaped tablespoons sugar
                               1 level teaspoon salt
                               1 cup of water

METHOD:    Wash your bloody hands first!

Mix the exact quantities of dry ingredients in the bowl with a spoon and make a crater in the center before adding the exact amount of water. This is critical as any more or any less will make the mix too dry or too wet.

Initially mix with the spoon and finally mix by hand in the bowl until all of the ingredients are homogenous and the lump of dough has been flattened and folded many times to get uniform disposal of moisture content.

Smoothly mould the dough into a flattish disc shape about the size of the camp oven. The inclusion of the cheese produces a golden brown damper if not overheated and is a welcome change from that slightly bland standard damper taste.

Put about 5mm of dry flour in the bottom of the camp oven prior to the damper going in and the damper will lift out with very little mess. Pre warm the oven in the sun or near the fire and keep it there with the damper in it for at least 30 minutes before cooking. This will allow the damper to rise.

Cook the damper using coals in a shallow depression, using twice as many coals on the lid as underneath. The shallow depression can be dug with a shovel about half as large again as the camp oven and coals put in the bottom. Don’t use too many coals or the damper will burn and cooking time will usually be 45 to 60 minutes.

Camp Oven Cooking

Camp Oven Moroccan Roast Goat With Mint & Garlic
Or You Could Use Lamb!

Ingredients:      1 x 2 kg (approx) boned out *young goat leg.
                        4 cloves garlic – finely chopped
                        Handfull chopped mint leaves.
                        1 Tablespoons salt
                        Master Foods Moroccan herbs.
                        Pepper grinding to taste.
                        1 x can diced tomatoes.
                        1 x large carrot – long diced
                        2 x spuds – sliced
                        1 x sweet potato – cubed
                        4 or 5 pieces cubed pumpkin
                        1 x stick celery – small dice
                        1 x large onion – finely chopped
                        Juice of 1 lemon
                        3 x Tablespoon olive oil


Trim any fat off the goat leg open it out, flesh up. Season flesh side with garlic, mint, a good shake of Moroccan herbs, pepper and salt. Roll up and tie firmly with butchers twine or brown string, at a pinch you could use fencing wire! Splitpin said he once used fish hooks!!!

Pre-heat the camp oven, with trivet in, oil trivett and cover with sliced spuds. Place the goat leg on the spuds. Pour the lemon juice over the goat leg and drizzle the olive oil over it.

Place the rest of the veges around the goat leg and pour the can of tomatoes over the veges and season the lot with the Moroccan herbs.

Place camp oven on a good bed of coals and place a shovel full of hot coals on top of camp oven.

Sit back and have a few beers and test meat after 1 hour with skewer if the coals are nice and hot. If it is windy it will take longer to cook. A good idea if it is windy is to dig a cooking pit at least as deep as the camp oven. If clear liquid comes out when you skewer the goat leg, she’s cooked mate so take it off the coals or it will overcook. If blood comes out when you skewer it, she’s raw! More time needed.

When cooked, the goat should be pink on the inside. Now where have I heard that before? A nice sauce can be made with the juices left. Skim any fat off the top and make into a gravy with an instant gravy mix like Gravox.

This dish goes marvelously with Parmigana Damper, beer and/or red wine!

*A young goat is preferable, don’t shoot an old billy or a female in season. Too many hormones and too gamey! Hang the leg, wrapped in cheesecloth, for a day in the shade after the kill to help temper the gamey taste.      

Monday, April 26, 2010

Blast From the Past - Falling off ST1100 Honda

Before we got into caravanning Spanner and I toured on a motorcycle. On this occasion Spanner stayed at home working hard to keep me in the motorcycles to which I was accustomed!

I decided to go up the North Coast and visit my brother Roscoe. Here is a video clip starting off with a ride across the Harbour Bridge early on the first morning then heading up Thunderbolts Way.

Language warning at end of clip!


Friday, March 5, 2010

Surfdog Slays it at Potato Point!

It'll go faster in the water Dad!


Yeah! Cowabunga, here I go!


Hahahahahahahaah! Wipeout!!


Where'd that bloody board go?


Shoulda worn me wettie!

Thursday, February 18, 2010

Solar Powered Vent Fit to Jayco Sterling


Four years ago I fitted one of these solar vents in the skylight of our bathroom and another one in the toilet of our home. It is not a difficult job and well within the scope of your average handyman - if there is such a creature!

The vents are still working gangbusters and start in the morning before the sun hits them. I figured one of them fitted to a roof hatch in the Sterling would circulate the air and get rid of any stuffiness if the van was not used for a period of time.

The item is a Sunvent SVT-212S and was purchased on the net. I didn't want one with a battery that I had to turn on and off so the stainless Sunvent filled the bill. Sol shines and Sunvent vents! Actually the vent works even with medium cloud cover.


I decided the easiest way to fit it was to remove the roof hatch and do the fit on the workbench. This would leave a hole in the van roof and we hoped it wouldn't rain! Removal is pretty simple with two hinge pins and two lever catch pins to be removed. This was done from inside the van.

Nice blue sky and no sign of rain so the fit begins.

The hatch has two layers of perspex about 12mm apart and the plan was to mark the opening using the rubber seal as a template and drill a 10mm hole to start the cut.

I then cut out the opening using a jigsaw with a very fine blade. A word of warning here. Don't stop halfway through the cut as the perspex melts as it is cut and when you stop it solidifies the blade to the job! The opening was cut undersize and then opened out to the correct size with a mini die grinder. Perspex residue gathers between the two layers and this was washed out with detergeant and water and the hatch dried in the sun.


Then I had a look outside and decided I needed to sharpen the footwork!
Them's rainclouds Shooter!


The solar vent was installed in the opening with a smear of glazing silicone on either side of the rubber seal. There are three stainless self tappers to fasten the solar vent to the hatch and about completes that side of the install. There is a slide over type of plastic gasket that hides the cut on the inside.

Then it was time to re-install the hatch. I had removed the hatch from inside the van but decided it would be quicker and easier to do the install from outside. Maybe not safer, but quicker! Fibreglass van roofs are slippery and driveways hard!

The whole operation took about 1 1/2 hours and the vent is working beautifully. Below are two pics showing the finished job.


And the dark clouds blew away without a drop of rain falling!

Saturday, February 13, 2010

130 Watt Solar Panel Install On Jayco Sterling

A word of warning here! This is not a "how to do it" guide! It is merely an account of how I did the install!

If you like your free camping and a few luxuries then you need elecktrickery of some sort! The Sterling runs a 12 volt DC lighting and 12 volt water pump setup. When on a powered site the 240V AC goes thru the Setec ST35 power supply which acts as a trannie (no, not THAT sort of trannie, Alice) and a battery charger for the 110Amp Hour AGM battery.

The choices when free camping are a generator - not in a National Park however, run the tow vehicle for an hour or so a day to charge the battery, or fit a solar panel. After a quick discussion with Spanner it was decided that a solar panel was the go.

I love the internet! Bang in "solar panel caravan" and there is all the information you could wish for. Some of it is conflicting but look further, chase links and use some common sense then make a decision!

Here is the roof of the Sterling with the question being, where do I put the panel?

The van has an ensuite at the rear so the extra 15kg of panel across the roof here would, in my humble opinion, lighten an already light ball weigh. The battery is also up the front under the bed so that would mean a long run of volt eating copper cable or expensive non volt eating cable!

Another option was along the near (left) hand side of the van. I was not happy with the roof supports I would be fastening to here and running cable presented a problem as well.

And the decision is:

Across the front of the van, directly in front of the front roof hatch. Lotta fronts Eh!! Sound like Tim Bailey. This location provided adequate fastening points and best of all a straight cable drop thru a wardrobe ( that's a closet to you Tex!) and under the bed to the battery.

I had chosen a Sharp 130 watt panel, part number ND-130T1J, purchased on the internet from Todae. See link below:

http://www.todae.com.au/Products/allsolarpanels/130wsharpsolarpanel/

A suitable solar regulator to protect the battery from overcharging and stop current feedback to the panel at night was also purchased. Installation and user instructions for the Setec say that with a solar panel install the solar regulator is cabled directly to the battery and not through the Setec so that is how it was done.


Sharp panel in untidy workshop!

I used 6mm auto cable because the run is only 2.6 metres. There is a formula to work out current drop via cable size and from my 1960's maths education, 6mm would/should be adequate. 6mm cable runs from the Setec to the battery as an original install. I soldered every join that I could. The battery lugs were clamped. I included an in-line auto type fuseholder with a 10 amp fuse between the solar regulator and the battery. This amperage fuse was chosen because the specs sheet for the panel said the Maximum Power Current output is 8.09 amps.

I didn't want any of this elecktrickery stuff running backwards from the battery and frying the solar regulator, or worse still, the panel. There already is a 35 amp fuse on the cable from battery to the Setec.


110AH AGM showing both fuse holders.

Solar panels perform best at 25 degrees C. For every 10 degrees C above this they loose approximately 5% of their output. So flat mounting the panel to the roof with no air gap underneath would reduce efficiency on hot days. Because of the location of supports in the roof of the van I built up my own mounting system for the panel, lifting it 12mm above the roof to allow some air circulation but not too much wind resistance when travelling. See pic below.


The next challenge was to get 15kg of panel and mounting system onto the roof safely. Spanner couldn't help as she fell down a flight of stairs whilst working and broke her arm! Oak Flats Harry came to the rescue and passed the panel up to me on the roof. A few weeks ago I had polished the fibreglass roof and it was slippery!

I had cleaned the area where the mount would sit with a good quality wax and grease remover as the panel would be fixed with a sealer/adhesive made by Fuller called Toolbox as well as mechanically fastened with stainless screws.

Once again the Internet came into use here in finding a suitable sealer/adhesive. The data sheet for Fullers Toolbox stated that it resisted salt and chlorinated water, was suitable for sealing shower units, had a 3.2 MPA hold/tear strength, was heat resistant to 100 degrees C, was compatable with alloy and fibreglass. And you can buy it at Bunnings!


Toolbox adhesive/sealer in white and stainless fixing screw.

The panel was then fixed to the roof with Toolbox and the stainless screws. A studfinder was used to locate the roof supports to fix to. I used a hole saw to cut through the roof into the cupboard space underneath and passed the cables thru and sealed it all up with Toolbox also.

All cabling is now connected and the panel is hopefully doing the job. My neighbour down the road is an electrician and I am trying to catch him at home on a sunny day so he can take some measurements for me.

Below is a pic of the finished job. The Toolbox sealing the stainless screws looks a little untidy but functionality must win out over looks everytime! And you can't see it from the ground anyway.


Friday, February 12, 2010

Mundane History!

Spanner and I recently purchased a used 20' Jayco Sterling caravan with ensuite. Spanner reckons the whole world is a urinal to most guys but she was sick of the bucket and a solar shower.

This is our third van in 2 years as we worked up from an ancient 16' Viscount popup that had to be pushed up manually (Hey! It was cheap!) We bought it on Ebay, sight unseen apart from a few pics. We loved the old shitter. She served us well. At sometime in her life she had a spring over conversion and the chassis strengthened.

Virginia the Viscount weighed in at 1800kg on the road and fair pulled the bum outta the 1989 two litre petrol Courier with 289,000 k's on the clock. Yeah, I know, the Courier was only legal for 1500kg. The Viscount had mechanical over ride brakes as well!

She pushed us down MacQuarie Pass one time (only once!) It took all the old broken down truckie skills in first and second gear when the brakes on the Courier went softer then a pollies brain.

The 26 cars behind us really appreciated my driving display. Every one of them gave us the V for Victory sign when we finally pulled Virginia up at the bottom of the Pass.

That's how I learned that overide brakes never work. Not even in 1965 when they were new!

We almost lost our Virginia that time!

Virginia departed the scene when she almost chopped Spanners finger off as we were packing up one time.


Virginia theViscount in all her glory. Spanner too!